How I Plan My Instagram Reel Content in Advance
You hear it all the time: if you want to increase engagement and attract more of your ideal clients on Instagram, you need to have a strategy. Whether you’ve heard that a million times from me, or other business coaches, you may have experienced some overwhelm trying to follow this advice. After all, coming up with your marketing strategy and finding the time to post (and) engage can suck up your whole schedule! That is… Unless you don’t have your content planned in advance.
Planning your Instagram content, AKA batching, is an essential part of the process if you want to attract potential clients to your account — without spending all day, every day creating fresh content.
If you follow me on Instagram, you may know already that I batch my content. But how? That’s the big question. Since Reels is a highly sought-after topic in my CEO Mastermind Group, today, I’m going to take you step-by-step through how I plan my Reels ahead of time so you can get back to crushing your to-do list!
Step 1: Get to scrolling!
This may be the first time you hear someone instruct you to scroll through social media to help your business, but this is truly the first step! That’s because it’s a time to get inspired, save Reels you think are good ideas, and save sounds that you want to use. It can also help you get familiar with trends that are going around.If you’re not familiar with how to save a sound from Reels, here’s how you do it:
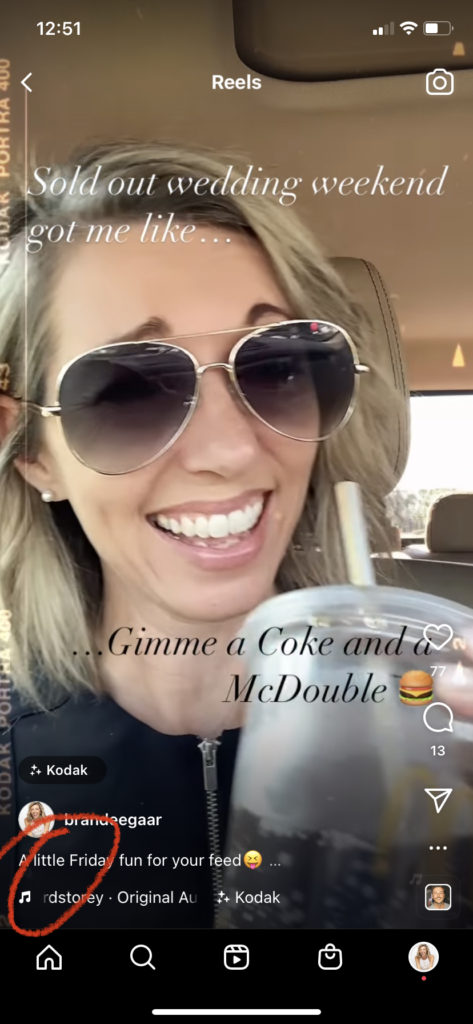
- When you hear a sound you like, tap on the music note at the bottom. This is the track name.

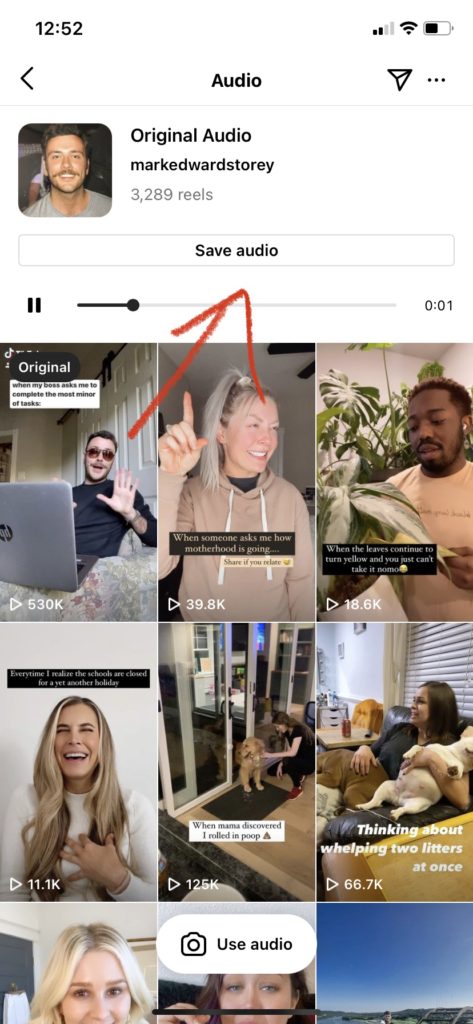
- Once you tap on it, you’ll be taken to the sound’s “page” – or where you can see who has used this sound. At the top, there’s a button that says “Save audio.” Click on that and voilà! Your sound is saved.

- To access your saved Reels, you can see them when you click the music note icon when you go to make Reels.

Yep, it’s really that simple!
Step 2: Block time on your calendar to batch IG Reels
Now that you’ve gathered up your inspiration, it’s time to block some time on your calendar to batch your Instagram Reels. This is key because if you don’t schedule out time on your calendar, something “more important” will always take priority. I want you to treat your batching sessions as just another piece of the puzzle that’s going to move the needle forward in your business!
I usually schedule out two hours of my time once a month to batch my Reels for the following month. That gives me plenty of time to film everything I want to film, put some text over the Reels, and save them as drafts.
If you’re thinking, “whoa, Brandee. Only two hours?! It takes me two hours to film just one!” You will love the resource I have to share with you in Step 5 to make your batching sessions as efficient as possible!
Step 3: Decide which Reels you’re going to make
Now that you have a time blocked on your calendar, this is where the planning stage comes in. From everything you’ve gathered, you want to decide which Reels you want to make. Take a look at your upcoming events, your blog posts for the month, what your audience has been asking you about lately, what you saved as inspiration, and choose the type of content you want to focus on based on all that data.
You’ll want to choose at least eight of your saved sounds that you feel fit perfectly with those concepts. From there, you can decide on a more concrete idea of how you want to film the Reel.
Step 4: Decide what your message is for each IG Reel
I want you to go into each Reel with a strategy. There are three main pillars I tell my clients to focus on when creating Instagram content:
- Education. What are the pain points your clients are facing, and what are the solutions you can bring to the table? Or what burning questions can you answer?
- Emotion. With a Reel or sound, can you help your ideal clients see themselves in the moment that you’re sharing? Can you speak to their dreams and hopes?
- Entertainment. What can you share that boosts trust, relatability, and likeability? How can you connect with your audience on a more personal level?
With every Reel you create, it’s helpful to have these three pillars in your mind because they can help you narrow down the focus of your Reel.
Step 5: Start batching!
Once you know which Reels you will make and the general idea of what you’ll say for each one, it’s time to start batching!
To take the overwhelm out of batching, keep your process simple. For example, only change your shirt for each Reel, find a spot in your home or office that has good lighting (or use a ring light), and don’t try and get too creative with transitions and special effects! (Unless you love that!)
The goal here isn’t necessarily to be the most creative. It’s to make sure you’re using your time as efficiently as possible so that you deliver valuable content to your ideal clients without overwhelming yourself.
After you film each IG Reel, add any text you want to add and click “Save” to save it in your drafts. You don’t have to take the time to add the caption and hashtags — that can come later. Instead, we just want to get them all filmed, edited, and ready to post when the time comes.
Alright, now time for that resource I promised you: the Reel Traffic Toolkit! The toolkit is a self-paced course I created to teach you how to film Reels, and one of the bonuses you can find in this course is a module all about how to batch. This module takes you step-by-step, visually (who else is a visual person?), how to batch your Reel content efficiently and smoothly. You’ll be a pro in just a matter of minutes! Learn more about the Reels Traffic Toolkit by clicking here.
Step 6: Post!
Now that you have eight batched Reels, you have enough to post two times a week for a whole month! And once you start to see the engagement on your page, you’ll be addicted!
Now you’re ready to batch IG Reels!
Congrats for being your way to being an IG Reels pro! They’re are an easy way to share your work and create a lasting impression with potential clients. With a little preparation, you can create Reels that speak volumes about the solutions you provide to your potential clients and build a great relationship with your followers!
Blog Post
© 2021-2025 Wedding Pro CEO | support@weddingproceo.com | Legal | Brand Clarity